Key Google Tag Manager capability examples for web readers
Table of Contents
Google Tag Manager is a Google tag management system which delivers easily integrated tag management into your Pugpig web reader, this works for both Pugpig Publish and Pugpig Bolt.
What does this mean in practical terms?
By embedding GTM in your web reader you can server custom actions which you can create within your own GTM account, this could be anything from custom analytics triggers to a sticky banner, chatbot or popup triggered by user behaviour. Current client users of GTM can simply create a new GTM project for their web reader while clients new to GTM can setup a GTM account for free via marketingplatform.google.
Our Pugpig onboaders can add the GTM ID within your web reader code, this ID can contain one or multiple GTM actions. Once you have your GTM ID embedded, any changes activated within your GTM project will atomically update to the web reader without any Pugpig actions, providing you more flexibility and customisation.
Here are some simple examples demonstrating GTM capabilities;
Example 1
Download app popup form
Depending on your user demographic and targets, you may find it beneficial to try and migrate web reader users to downloading the app version. One solution for this adding a GTM action which brings a third party popup directing users to app stores.
Live client example (which appears after 10 seconds on WR and redirects on CTA clicks):
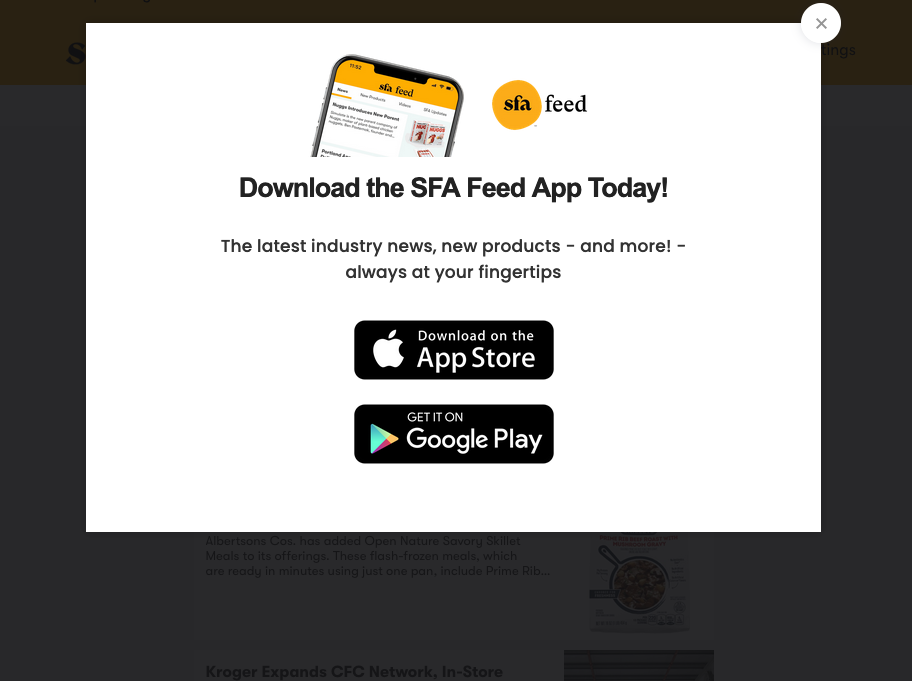
Creating a popup:
If you have an in-house dev team, they can create the HTML popup otherwise I would recommend using a third-party creator for the web (e.g. bannersnack.com, fastfieldforms.com, unbounce.com or paperform.co).
When making your HTML popup, make sure it has an exit option and active CTA's.
Add popup into GTM:
1. Log in to your Google Tag Manager account and click the New Tag panel.
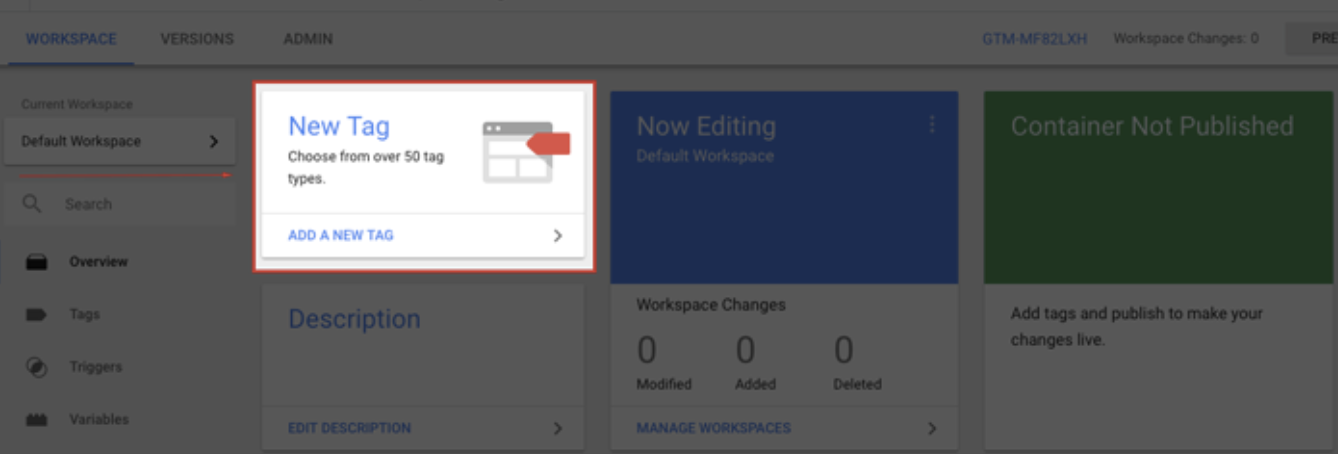
2. Click the Choose a tag type to begin setup.

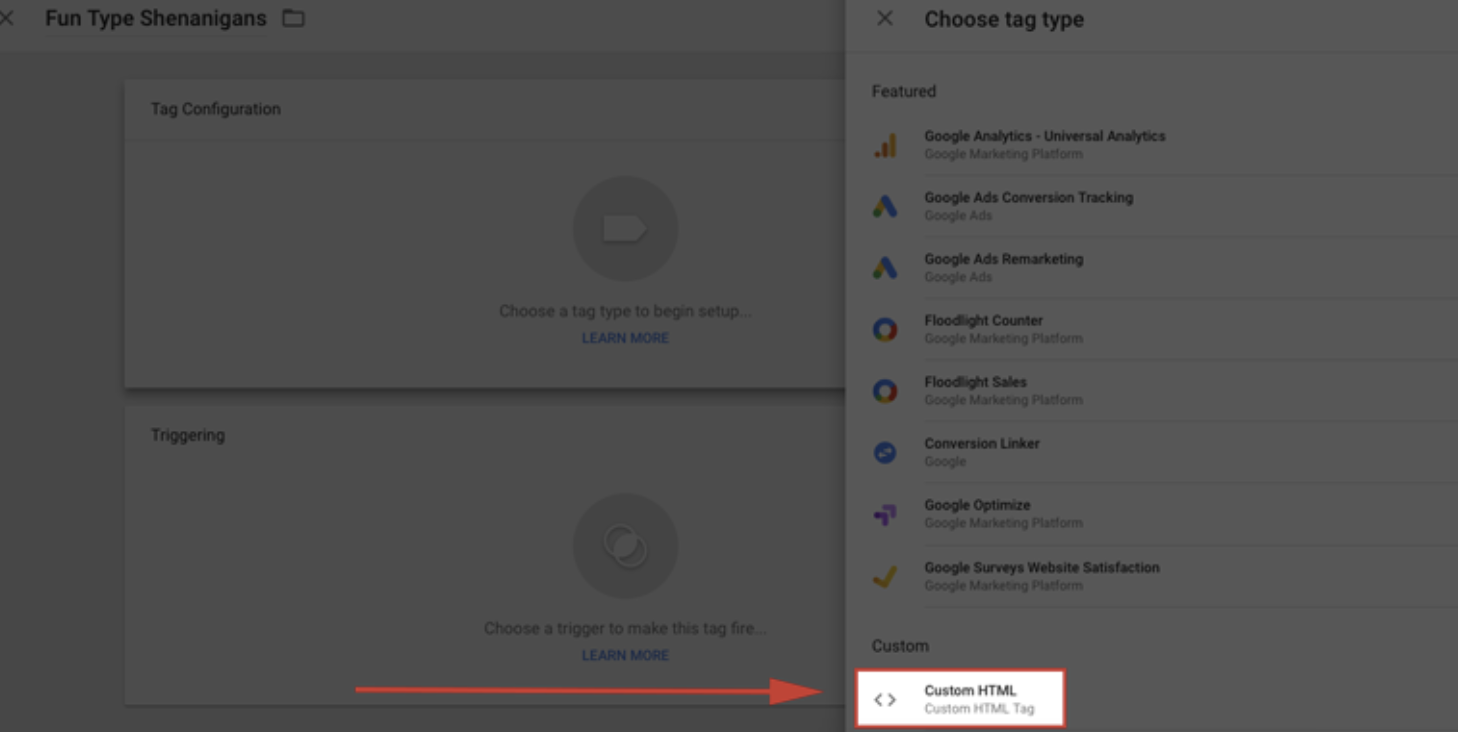
3. From the Choose tag type menu, select the Custom HTML option.
4. Paste your Popup script (from your in-house developer or external third-party creator) into the Tag Configuration HTML blank field. Click Save.
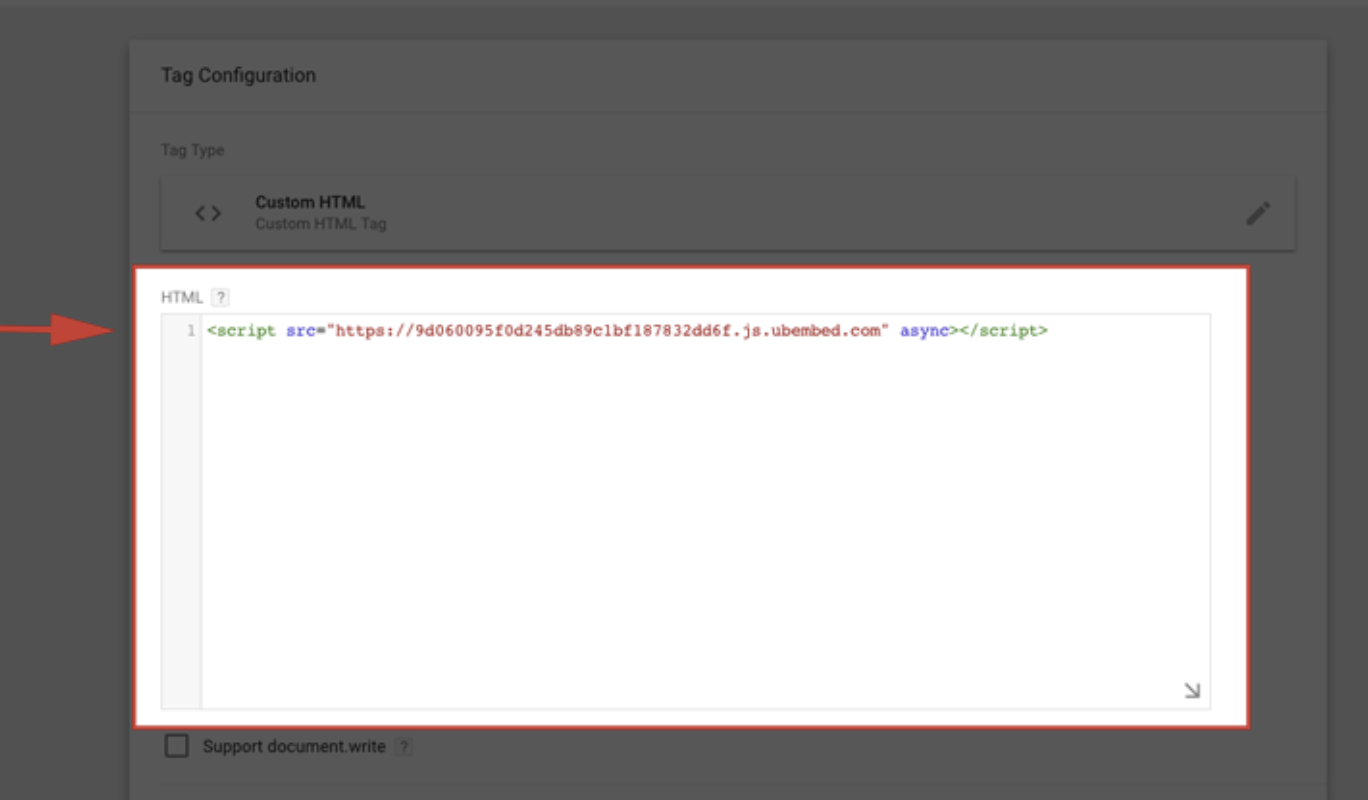
You’ have now installed your Popup but now you’ll want to set up your event triggers before you publish.
5. Scroll down and click the Choose a trigger to make this tag fire.
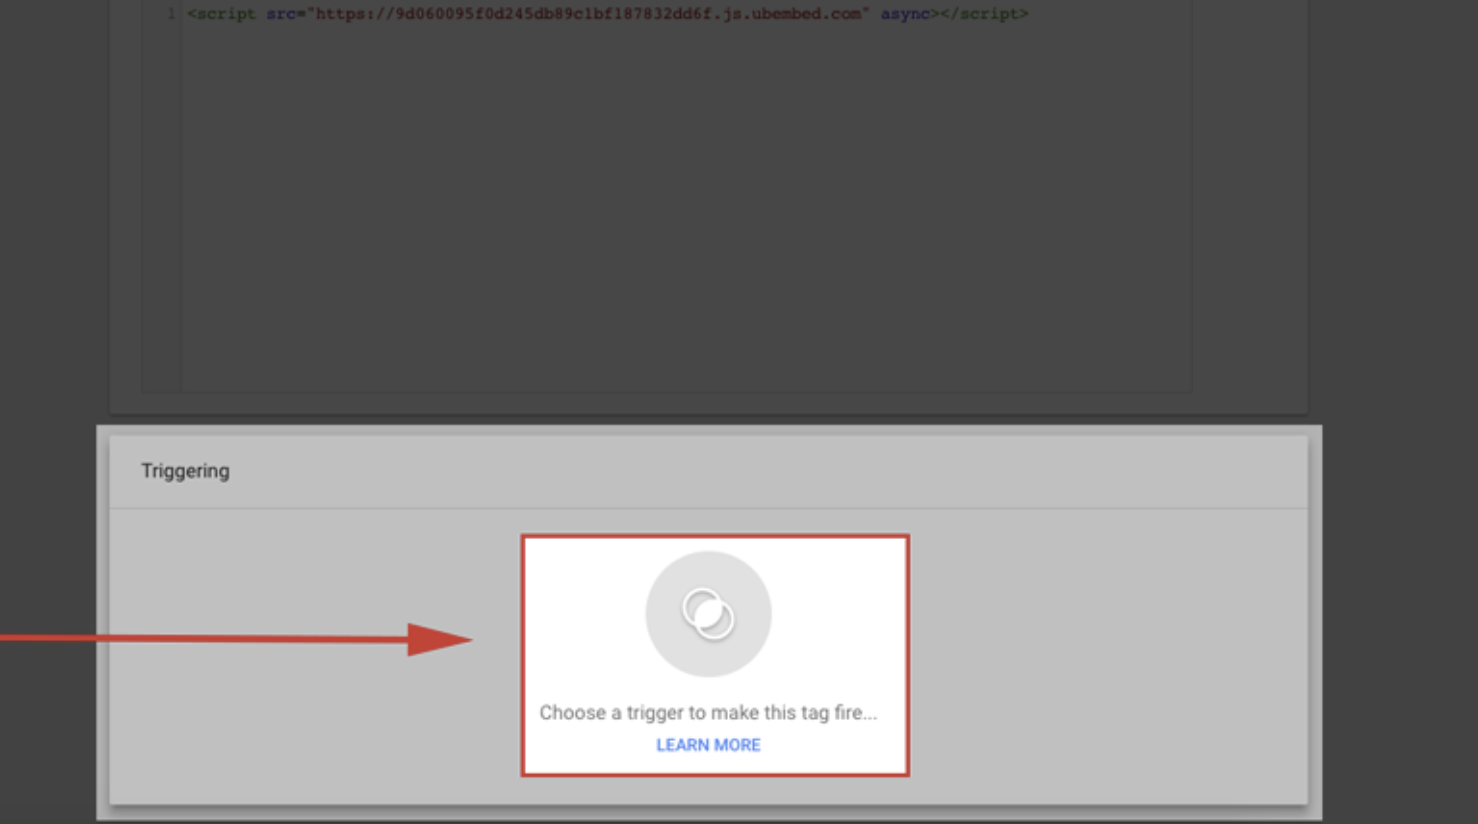
6. Select the + sign at the top right-hand side of the screen.

7. Click Choose a trigger type to begin setup.

8. Select the trigger type for which you’d like to set up a custom event.
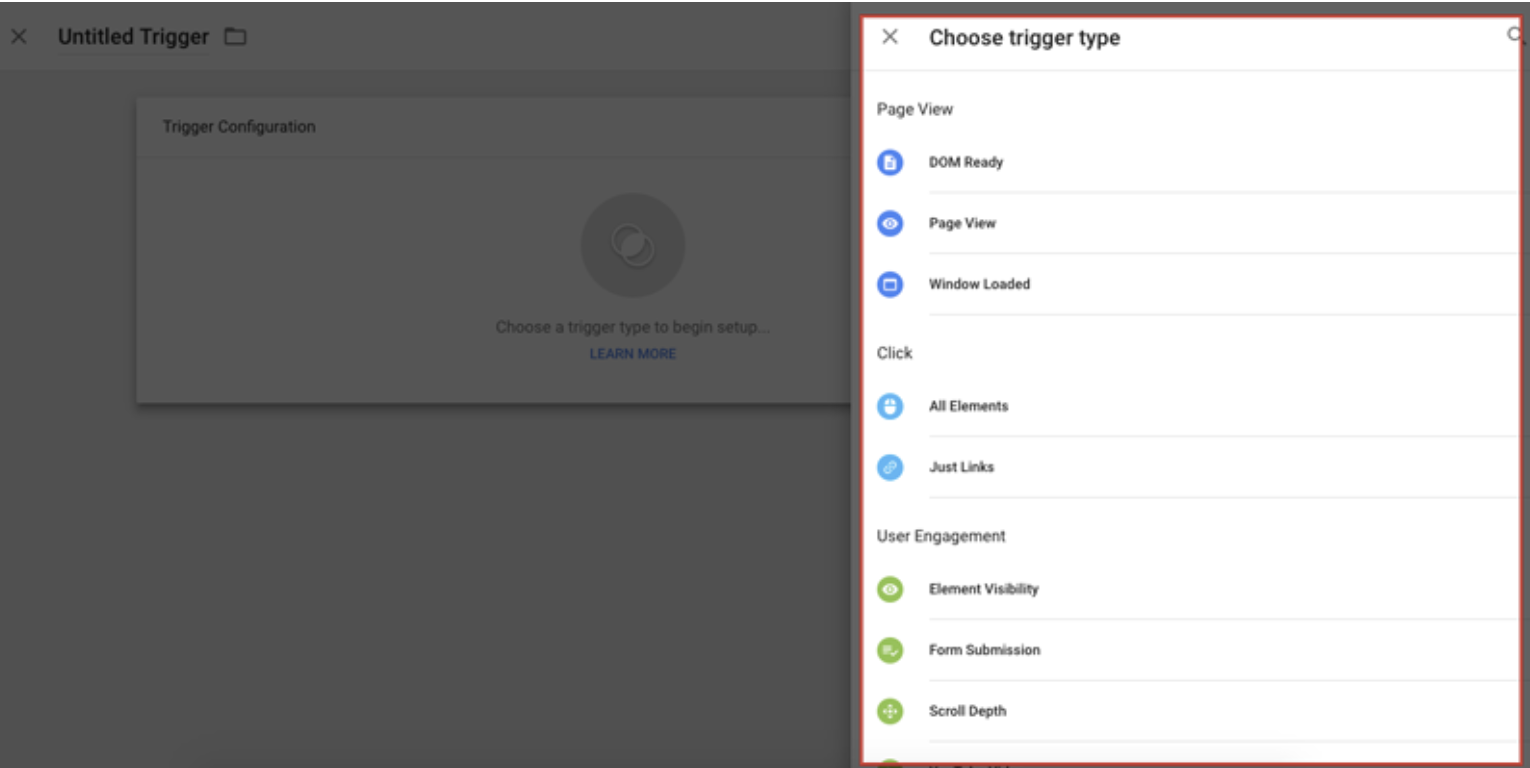
9. Click the Save button. You have now setup a custom trigger event for your popup which can appear in your Pugpig WR.
Example 2
Chatbot
It can be useful to increase user interaction on WR via adding a third-party Chatbot. Firstly, find the Chatbot which covers the functions you require, a few standard recommendations are intercom.com and zendesk.co.uk (Zendesk also integrates with Pugpig native apps).
1. Create a new Custom HTML Tag in GTM
2. Edit the new tag and past HTML code from third-party chatbot
3. Choose a trigger to make this tag fire
Zendesk documentation on Google Tag Manager integration: developer.zendesk.com
Intercom documentation on Google Tag Manager integration: intercom.com/help
Example 3
Custom analytics - track button clicks
Pugpig Google Analytics provide a very useful selection of dimensions to track, however you may require custom tracking on your web reader. These can be setup through GTM. Here is an example with button clicks.
There are two types of click triggers in Google Tag Manager: All elements and Just links. As their titles imply, All elements trigger tracks clicks of any element (link, image, button, etc.), while Just links trigger tracks link clicks only.
1. Create a variable that tells GTM whether the link is outbound
To do that, go to Variables > User-defined Variables > New and choose Auto-Event Variable.
Then enter the following configuration:
Variable type: Element URL
Component Type: Is Outbound
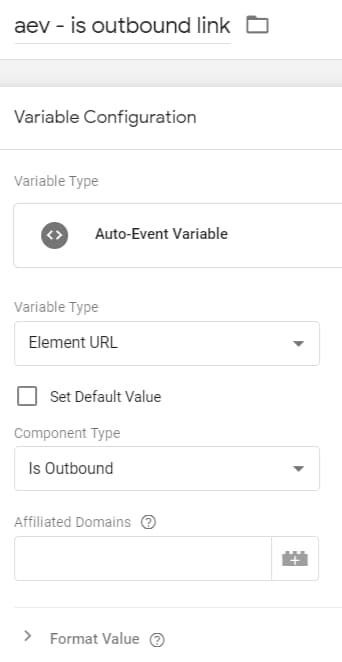
This is the minimum you will need to use in order to distinguish the outbound link from an internal link. This variable will return true if a visitor is on https://www.yourdomain.com and clicks a link that redirects to:
https://www.someotherwebsite.com
or a different subdomain that belongs to your domain https://blog.yourdomain.com
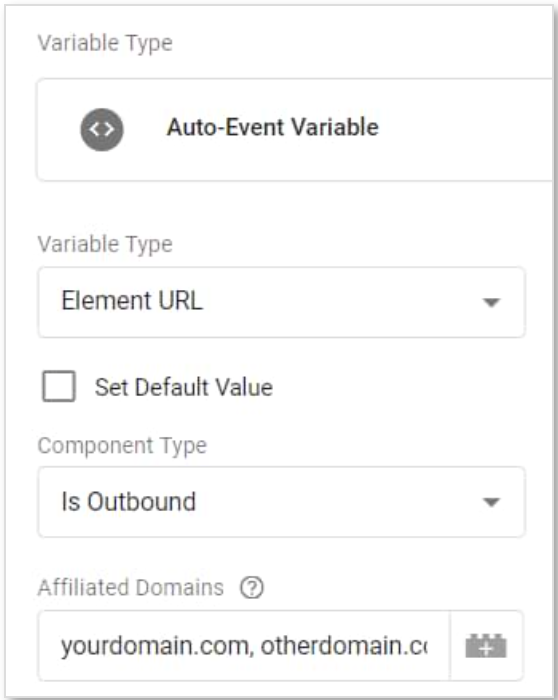
If you want to treat more websites as internal, you can use the Affiliated Domains field. Separate each domain with a comma.
Important: every item in the Affiliated Domains field is matched with the operator “contains”. So if, for example, you want to treat ALL your subdomains as internal (because by default, they are external to this auto-event variable), just enter yourdomain.com (replace it with your actual domain). Don’t use www, https, etc. Just the top level of your domain.
2. Enable a link click trigger in GTM
By default, Google Tag Manager does not track clicks. You can check that by enabling the Preview and Debug mode and refreshing the web page that you’re working on. You’ll see three events in the debug panel, Page View, DOM Ready, and Window Loaded.
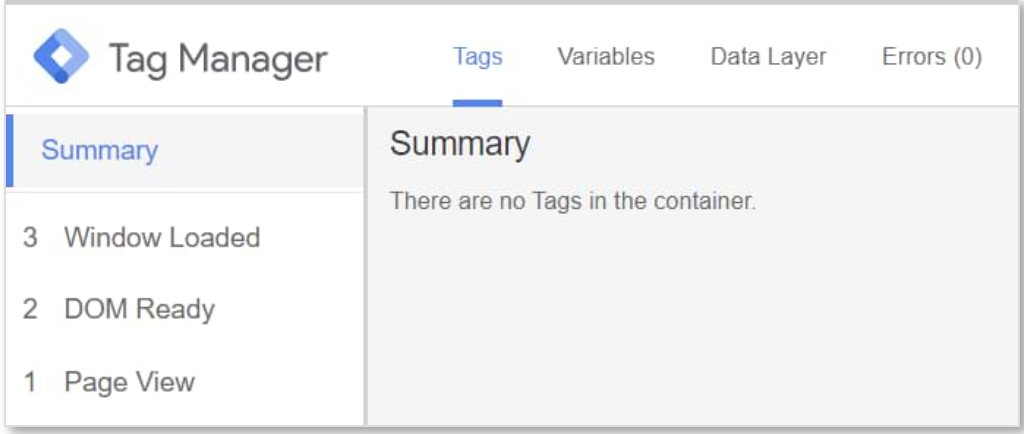
If you’re working on a new GTM container, click any link on the page (not in the GTM debug panel) and see what happens on the left side of the panel. Nothing. You will still have those 3 events (unless, of course, you have implemented some other tracking functionality in your GTM container sometime before).
In order to start seeing Link Click events in the preview and debug mode, we need to have at least one Link Click trigger enabled on a page.
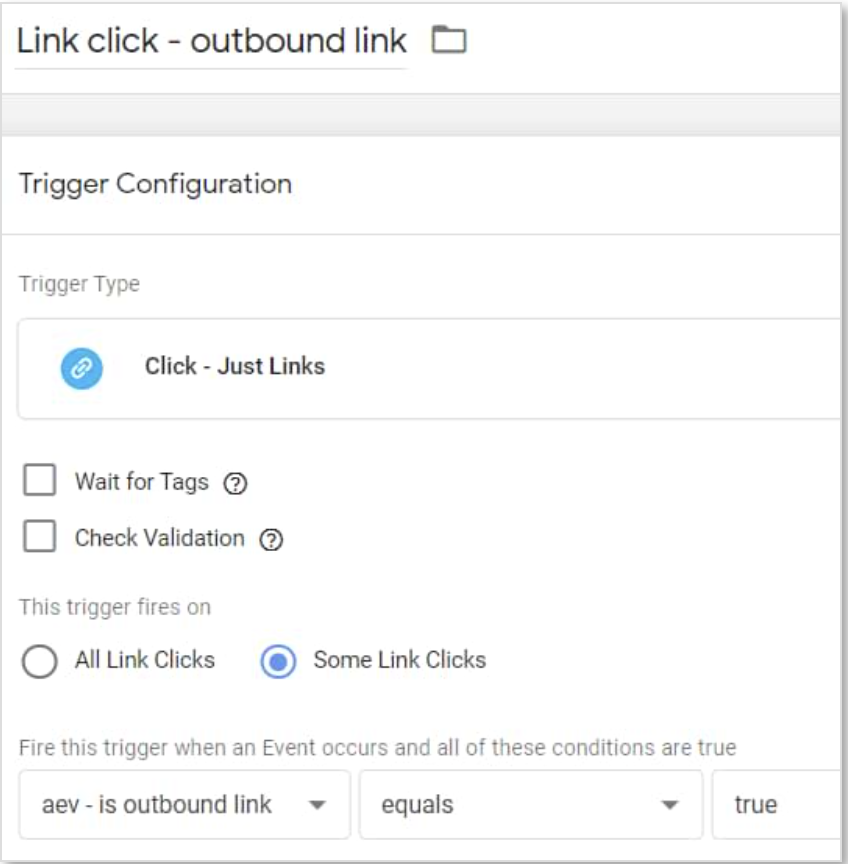
In Google Tag Manager, go to Triggers > Trigger Configuration > New > Just Links. Then choose Some Link Click and enter the following condition:
aev – is outbound link (that’s the name of the variable I created in the previous chapter) equals true
3. Create a tag
Now send outbound link clicks as events to Google Analytics. Go to Tags (in GTM) > Tag Configuration > Universal Analytics.
And enter the following settings:
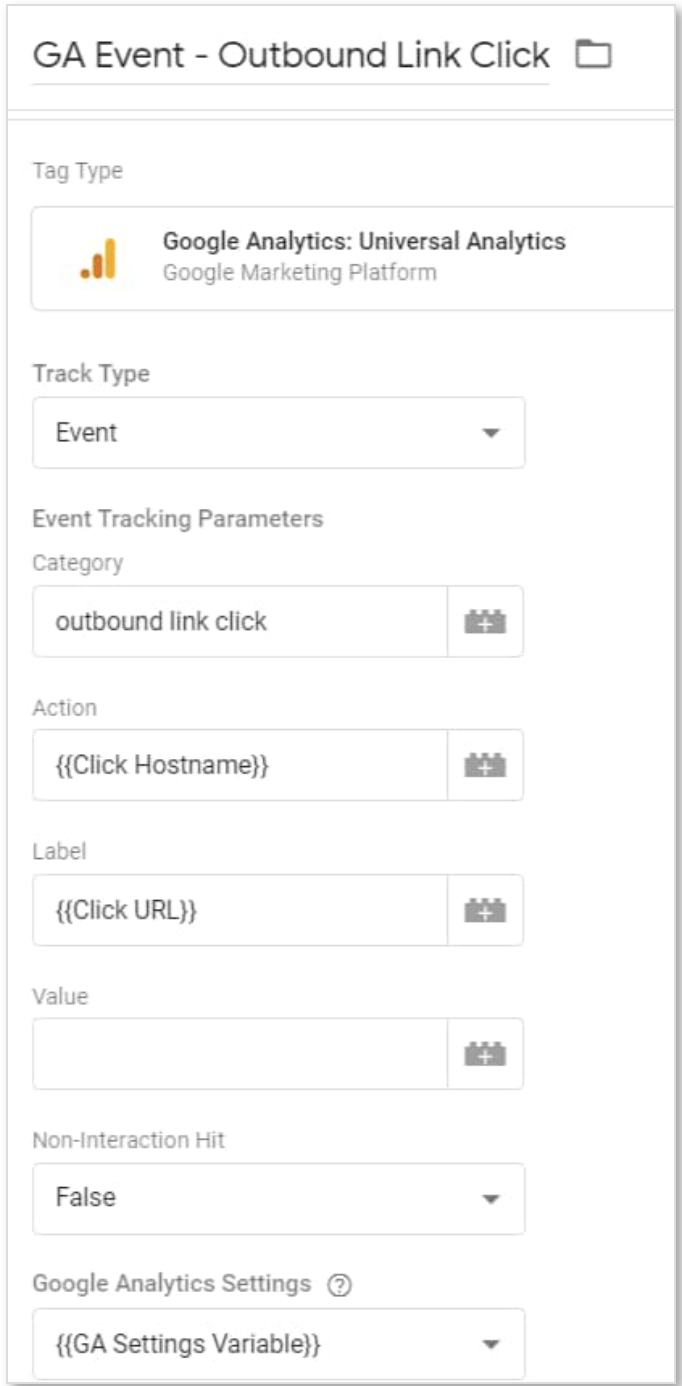
You can enter anything that is meaningful to you in the Event Category, Event Action, and Event Label fields. The screenshot above is just for the demonstration purpose. For this to work, you need to enable click-related built-in variables in GTM. Go to Variables > Customize > Click checkboxes next to every click variable (or at least Click URL).
If you don’t have any Google Analytics Settings Variable in the container yet, create one by clicking the drop-down list and choosing New Variable.
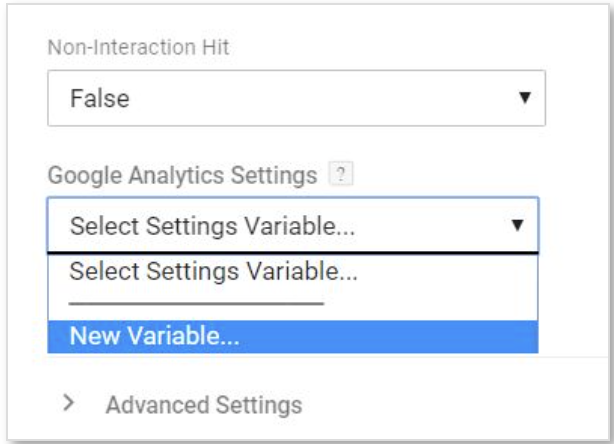
At least for now, enter the GA Tracking ID of your property (it looks like this UA-XXXXXXX-XX) and hit Save.
If you want to use other GA features, like custom dimensions, cross-domain tracking, you’ll need to do additional configuration in the GA Settings Variable.
With GA Settings Variables, once you create a single change in the variable, all the tags that are using the variable will automatically inherit the change.
4. Test - Enable (or refresh) the Preview and Debug mode, go to your web reader and refresh the page. Test your button and then scroll down to the Firing triggers section and check if all the conditions were not met (marked with a red X).
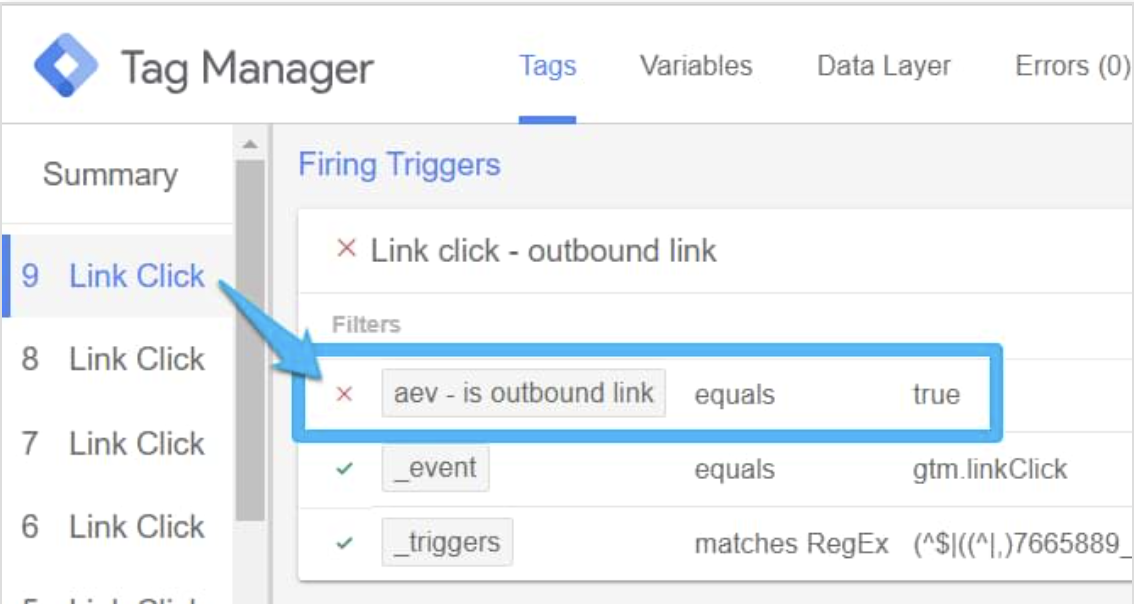
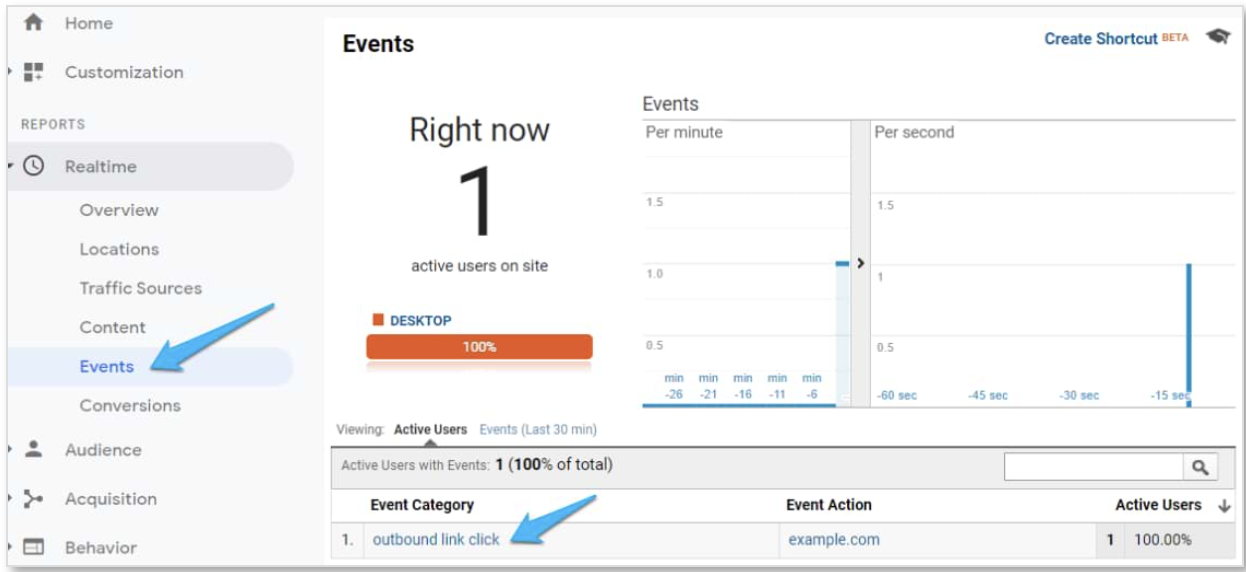
Then check GA real-time event reports and see if you are getting the data.
In GA, go to Realtime > Events, and you should see the click data you’ve just tracked with GTM.
5. Create a goal in Google Analytics
Goals are interactions/behavior that you treat as something important. By definition, they are designed to measure how your website visitors are behaving and whether they do the activities that are important to your business (like signup, download, etc.).
In GA, go to Admin and in the View column choose goals. Create a new goal (keep in mind that Universal Analytics allows you to create 20 goals per view).
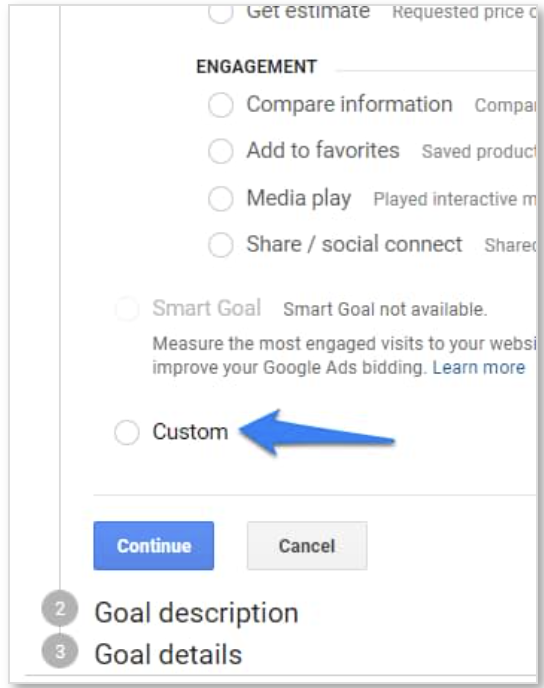
Choose Custom > Enter the name of the goal. Name and choose the Event as a goal type.
Fill in you enter category, action or label exactly as you sent those events from GTM to GA.
You can enter just outbound link click in the event category (of Goal’s settings). This means that all events with such a category will be treated as completed goals. Although I don’t see any value in tracking ALL clicks as goals, it is possible.
You can enter outbound link click as event category and https://socialnetwork.com/our-business-name as the event label. In that case, only clicks of a specific link will be treated as a goal.
-----
Find out more about GTM features: https://marketingplatform.google.com
Please contact support@pugpig.com for more information.


